How to Prep Interlock for Sealing
Ask a Question
Send us a note and we'll get back to you — usually within one business day.
Prepping interlock for sealing means getting the pavers clean, dry and structurally sound before any sealer is applied: power washing away built-up grime, re-sanding loose joints, removing weeds and moss, and letting the surface dry completely. Skip these steps and the sealer traps dirt and moisture instead of bonding to the stone, which leads to peeling, clouding and a finish that fails early. Prep is the part of the job that decides how long your sealer actually lasts.
That matters here in the GTA, where freeze-thaw cycles, road salt and spring rain put interlock through more stress than almost any other surface. Here is how to prep your driveway, walkway or patio the right way.
Why Prep Work Decides How Long the Seal Lasts
A sealer only bonds as well as the surface underneath it. If the pavers are dirty, damp or covered in old joint sand, the sealer sits on top of that layer instead of gripping the stone, and it starts to fail within a season or two. Interlock across Scarborough, Toronto, North York, Markham and Vaughan deals with freeze-thaw movement, road salt dragged home on tires and heavy spring rain, so a weak bond shows up quickly as peeling, white clouding or a patchy sheen. The cleaning and repair you do first is what keeps the finish even and long-lasting.
Start With a Thorough Cleaning
Clear the area first. Sweep off loose debris, move planters and furniture, and cover nearby doors, plants or finished surfaces you want to protect from overspray.
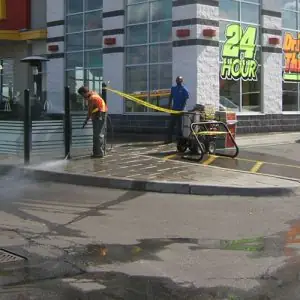
Then wash the surface properly. A professional power washing lifts out built-up dirt, old joint sand, moss and the white efflorescence that forms after winter. Pressure and nozzle angle matter: too aggressive and you can strip the joint sand or scar softer pavers, while too little pressure leaves grime behind that the sealer will trap. This is the step where most do-it-yourself prep goes wrong.
In the GTA, spring is when winter grime and road salt residue are most visible, so a proper wash before re-sanding makes a real difference. Cleaning is built into our interlock cleaning and sealing service for exactly this reason.
Repair the Joints Before You Re-Sand
The joints hold interlock together. When sand washes out, pavers shift, rock and start to sink, and water works its way underneath. Before sealing, any failed or missing sand needs to be replaced with fresh polymeric sand, compacted so it locks the stones in place.
Sweep excess sand off the surface before it settles. Sand left sitting on top of the pavers gets sealed into the finish and causes a cloudy, gritty look that is difficult to correct. The goal is full, firm joints and clean paver faces.
Remove Weeds, Moss and Stains
Never seal over live weeds. They will grow back through the joints and lift the sealer with them, and once they are sealed in, they are harder to remove. Pull or treat weeds down to the root before you re-sand and seal.
Moss tends to collect in shaded, damp areas and keeps moisture against the stone, so it should be cleaned off rather than sealed over. For oil drips, rust or leaf-tannin stains, have the spot treated and dried before sealing — ask us whether a particular treatment suits your surface, since not every product is right for every paver.
Check Drainage and Let the Surface Dry Completely
Interlock fails fastest where water sits. Much of the GTA sits on clay soil that drains slowly, so check that the surface slopes away from the house and that downspouts do not pour water across the pavers. Standing water softens the joints, feeds moss and — in winter — freezes, thaws and heaves the stones.
After cleaning, the surface needs time to dry. Sealing over damp pavers traps moisture, which turns into a milky white haze and weak bonding. Watch the forecast and avoid sealing right after rain or on a humid day; the pavers and the joints both need to be dry, not just dry on top. If you are unsure whether it is time to reseal at all, read our guide on how often to reseal interlock.
A Final Pre-Seal Checklist
Before the sealer goes on, run through this list:
- The surface is clean, with no visible grime, moss or efflorescence.
- Joints are re-sanded, compacted and free of excess sand on the paver faces.
- Weeds and moss are removed down to the root.
- Drainage directs water away from the surface, not across it.
- The pavers and joints are completely dry.
- The forecast is clear of rain for the curing period.
- The sealer is matched to your paver type — ask us whether a natural or wet-look finish suits your surface.
Frequently Asked Questions
Can I prep and seal interlock myself?
You can, but prep is where most DIY jobs fall short. Getting the pressure right, re-sanding joints properly and waiting for the surface to dry completely takes equipment and patience, and correcting a botched seal is usually more work than doing it right the first time.
How long does interlock need to dry before sealing?
It depends on the weather and how the surface drains, but the pavers and joints both need to be dry through and through — not just dry on the surface. In the GTA, that often means waiting through a stretch of dry, mild days after washing, especially in spring.
Should I reseal interlock in spring or fall?
Both can work as long as the surface is clean and dry and the forecast cooperates. Many GTA homeowners prep and seal in late spring or early fall, when temperatures are mild and the pavement is not scorching hot or rain-soaked.
What happens if I seal over damp or dirty interlock?
The sealer cannot bond properly, so it is more likely to peel, cloud or wear unevenly within a season or two. Moisture trapped under the sealer often shows up as a milky white haze that is difficult to remove.
Seal Tech Inc. serves Scarborough, Toronto, North York, Markham, Vaughan and the rest of the Greater Toronto Area. Call (416) 966-4200 for a free written quote, or contact us to send photos of your interlock with your quote request.